Chernobyl and Back
from SparkFun Electronics - Recent News Posts by SparkFun Electronics
https://www.sparkfun.com/news/1146
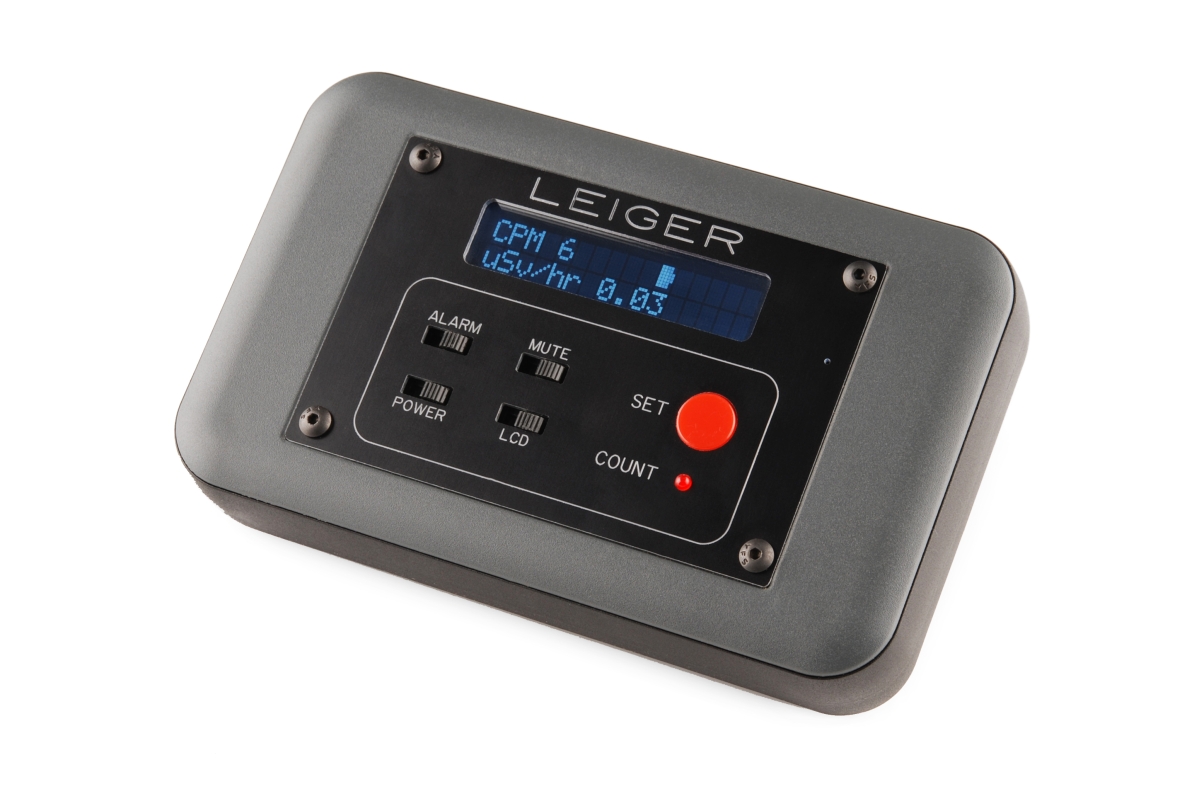
A couple months ago, I left for Chernobyl to do some photography and take some readings with my DIY geiger counter/logger. If you missed the original post about the trip, you can check it out here. I’m back now, and not only do I have some pictures, I’ve got some stories and of course some data. I’d like to say the Leiger worked perfectly, but that would be a lie. I ended up getting good data, but there were also some problems.
As I talked about in the video a couple months ago, I had a simple message that showed up on the screen to let me know if there was a GPS lock or not. Unfortunately, it always showed ‘no lock’ even if there was valid GPS information. I still haven’t fully gone through the code to figure out what happened, but I suspect it’s the way I was determining if the GPS sentences were valid or not. At first, I thought the GPS module had decided to kick the bucket. Thankfully, Dave brought his laptop and we were able to verify that the data was good and there was a GPS lock. But that wasn’t the only problem I encountered.
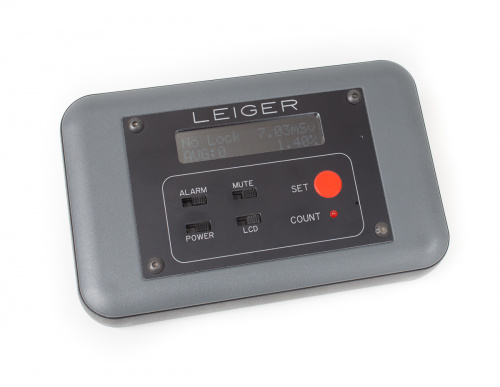
By my estimates (and real-world testing), I determined the Leiger could last around 26 hours on a single charge. However, about 6 hours into our first flight, I went to check on the Leiger, and it was dead! There’s an old saying, ‘if it ain’t broke, don’t fix it’. I should have remembered that. The day before the trip, I noticed there was a VERY faint sound coming from the buzzer. It was most likely some feedback from the high voltage side of the board. It was only audible in a very quiet room, with the enclosure off. But, it bothered me enough that I decided I’d try and ‘fix’ it. I ended up grounding the other side of the slide switch, which made it silent, unless it was enabled. So now the buzzer could be truly silenced.
At the time, I didn’t realize that when the buzzer was turned ‘off’, it was actually just shorting out the power supply. So that 26 hour run-time went down to just a few hours, and also made the whole unit get pretty warm inside. Thankfully I figured it out while I should have been sleeping on the plane. As soon as we landed in Kiev, I used my trustyLeatherman to open the case, dissemble the PCB, and cut the ground wire. It was still telling me it didn’t have a GPS lock when it actually did, but at least the power supply was good and it was logging data. It seems no matter how much you test something, or plan your design, there’s always going to be a problem. Thankfully, mine were relatively minor. I did end up getting some good numbers from the trip. Before we get into the actual data, I’d like to explain a bit more about the hardware inside the Leiger.
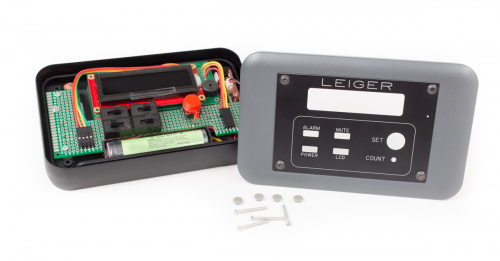
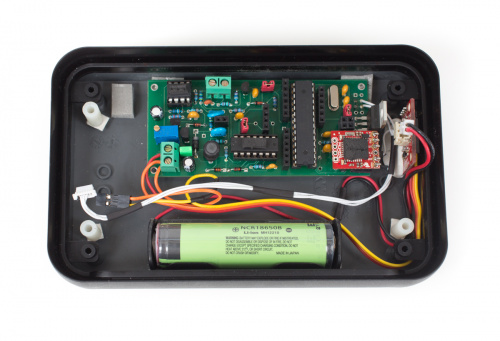
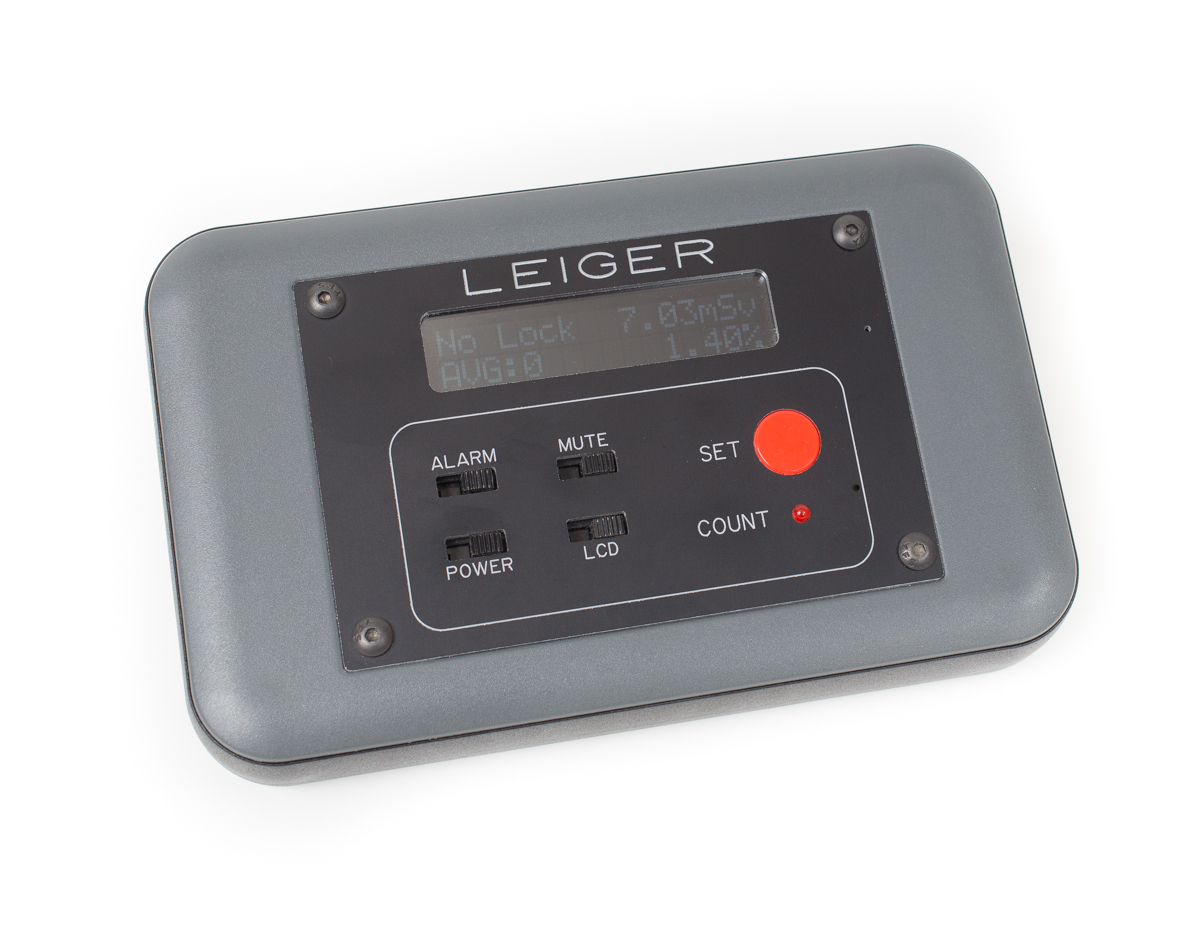
The main portion of the Leiger is based on the fantastic DIYGeigerCounter project. I bought it as a kit and made a few tweaks and adjustments. I wanted a simple interface for turning on and off the LED, buzzer, and screen. So, I moved a lot of the LEDs and buttons to a separate PCB. The PCB started as a standard protoboard, but I cut and hand-filed it down to the size I needed. I added some switches, a button, LED, and various connectors and mounting holes. I also needed a way to mount the GPS (a D2523T), as well as the geiger tube (SBM-20) itself. The case was from OKW Enclosures and faceplate was designed in SolidWorks and machined by Front Panel Express. As you can see, not much space is wasted here. I wanted it to be as small as possible.
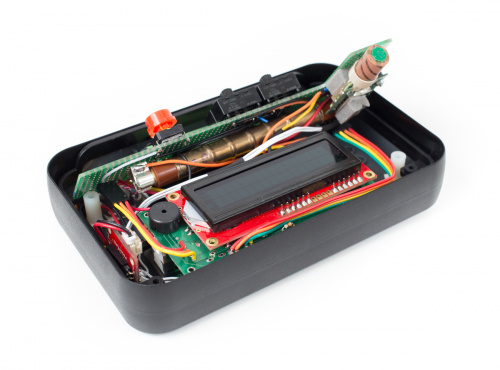
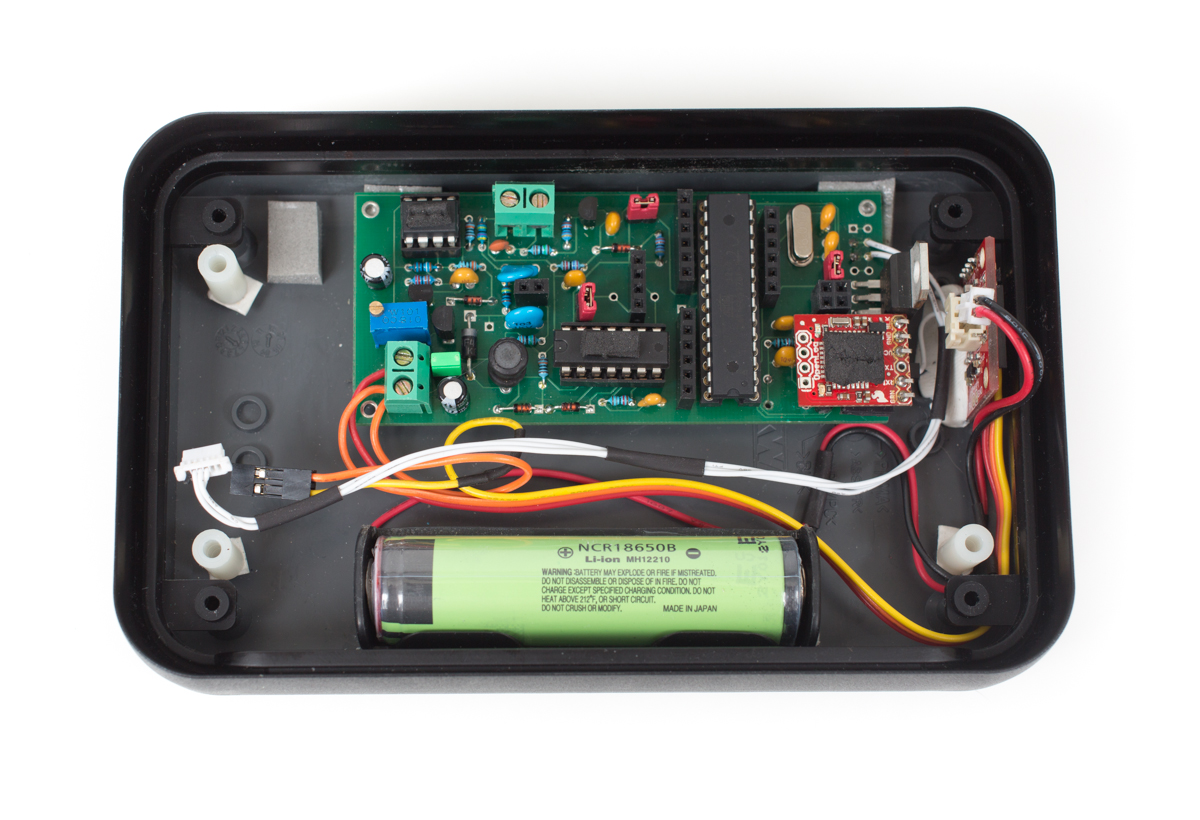
The control PCB as well as the LCD ‘shield’ sit on top of everything else, and cover the rest of the electronics. Once they are removed, you can see the actual Geiger counter board, the ATmega328, an OpenLog, and a PowerCell. The PowerCell worked wonders for this project and provides 5V to everything (except for the GPS, which has its own 3.3v voltage regulator), and charges the 18650 battery. Programming and testing was a bit tricky as the OpenLog sat on the FTDI header and needed to be removed for programming. Since most of the unit needed to be disassembled to get down there, I estimate I’ve completely disassembled the Leiger a few dozen times. If you look closely, you can see a lot of grey foam tape, which worked well for keeping everything in place, as well as added a bit of shock-proofing for travel.
Here is the code for the Leiger. I’m not a great programmer, so excuse the mess. It mostly works though. Ultimately, it just used an interrupt to count particles, and then displayed it on the screen in various fashions. It also stored these values at regular intervals (along with the GPS data) on an microSD, courtesy of the OpenLog. For keeping track of dosage (overall radiation exposure), I wrote this value to the EEPROM. I chose to write it to the EEPROM instead of the microSD because the RX (receive) was already being used by the GPS, so there was no elegant way to read in the dosage information when the unit was turned on. I didn’t want to rely on the softserial library (which is awesome) because I didn’t want to mess with the interrupts, which proved to be a good decision). In the end, all the information I wanted got logged. So, how radioactive was Chernobyl?
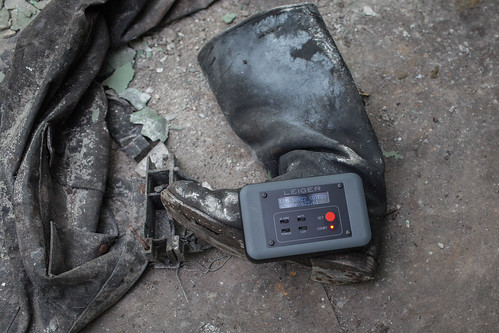
There’s not a really easy answer for this. Generally speaking, it’s not very radioactive. The vast majority of the zone has been decontaminated and is roughly the same level of radiation as the rest of the world. However, in a few instances, Chernobyl lives up to the hype. Normal background radiation (as measured by the Leiger), is around 20-30 CPM (counts per minute, or about 0.14 uSv/hour). In the picture above, you can see a reading of over 622 uSv/hour, or about 4500 times background. Also, if you’re doing the math, 10922 CPM doesn’t actually convert out to 622 uSv/hour. At first I thought it was an error. Actually, I didn’t anticipate measuring over 100k CPM, so the screen just isn’t formatted to display numbers that high. But as you can see in the data (posted below), it did peak at over 100k CPM (keep in mind that’s nearly 1500 counts every second).
What you’re seeing in the picture is a boot worn by one of the firefighters that responded immediately after the explosion. After 25+ years, it’s still extremely radioactive (I didn’t stay long). It was sitting in a hallway in the basement of the hospital. It amazes me that after all this time, artifacts like this still exist. We even saw a claw that was used to remove radioactive material from the roof of reactor 4. Overall though, with the exception of a few radioactive places and objects, the radiation is well controlled. So how much radiation did I end up getting?

After looking over the data, I came up with a good number. I took the total dosage (as recorded from the Leiger) over the course of the full 4 days I was in the exclusion zone. For all hours not accounted for with the Leiger (sleeping, when it was charging, etc), I took the background averages and filled in the missing gaps in the logs. Based on my readings for background levels here at home, and the total dosage I got from Chernobyl, I concluded that my 4 days in the exclusion zone was equal to just under 3 years of normal background radiation. It’s a lot in a short period of time, but it’s still well below the yearly limit for radiation workers, and just a fraction of the levels known to cause health problems.

Originally, I had planned to do a map of the radiation for the zone, but after getting the data back, I saw that the huge variances made graphing or mapping anything problematic. Because the hot spots were generally several thousand times higher than the surrounding area (and often-times inside a building), setting a scale was nearly impossible. I do encourage you to download the data and sort by the uSv rate. You will find some interesting places. See if you can find the cooling towers, Jupiter factory, hospital, cemetery (the only place in Pryp'yat that wasn’t decontaminated) and of course outside reactor 4.

For those of you that skipped down to the bottom, or missed the links in the text, here is the data, the Leiger code, and my pictures from the trip. Thanks for reading (or at least scrolling this far down). It was an amazing trip, and I’m very glad I went. For a photographer, just having access to these amazing locations was an experience of a lifetime. This was all a lot to cover and I’m sure I’ve left out some important details, so feel free to ask questions in the comments. Thanks again for reading.
A couple months ago, I left for Chernobyl to do some photography and take some readings with my DIY geiger counter/logger. If you missed the original post about the trip, you can check it out here. I’m back now, and not only do I have some pictures, I’ve got some stories and of course some data. I’d like to say the Leiger worked perfectly, but that would be a lie. I ended up getting good data, but there were also some problems.
As I talked about in the video a couple months ago, I had a simple message that showed up on the screen to let me know if there was a GPS lock or not. Unfortunately, it always showed ‘no lock’ even if there was valid GPS information. I still haven’t fully gone through the code to figure out what happened, but I suspect it’s the way I was determining if the GPS sentences were valid or not. At first, I thought the GPS module had decided to kick the bucket. Thankfully, Dave brought his laptop and we were able to verify that the data was good and there was a GPS lock. But that wasn’t the only problem I encountered.
By my estimates (and real-world testing), I determined the Leiger could last around 26 hours on a single charge. However, about 6 hours into our first flight, I went to check on the Leiger, and it was dead! There’s an old saying, ‘if it ain’t broke, don’t fix it’. I should have remembered that. The day before the trip, I noticed there was a VERY faint sound coming from the buzzer. It was most likely some feedback from the high voltage side of the board. It was only audible in a very quiet room, with the enclosure off. But, it bothered me enough that I decided I’d try and ‘fix’ it. I ended up grounding the other side of the slide switch, which made it silent, unless it was enabled. So now the buzzer could be truly silenced.
At the time, I didn’t realize that when the buzzer was turned ‘off’, it was actually just shorting out the power supply. So that 26 hour run-time went down to just a few hours, and also made the whole unit get pretty warm inside. Thankfully I figured it out while I should have been sleeping on the plane. As soon as we landed in Kiev, I used my trustyLeatherman to open the case, dissemble the PCB, and cut the ground wire. It was still telling me it didn’t have a GPS lock when it actually did, but at least the power supply was good and it was logging data. It seems no matter how much you test something, or plan your design, there’s always going to be a problem. Thankfully, mine were relatively minor. I did end up getting some good numbers from the trip. Before we get into the actual data, I’d like to explain a bit more about the hardware inside the Leiger.
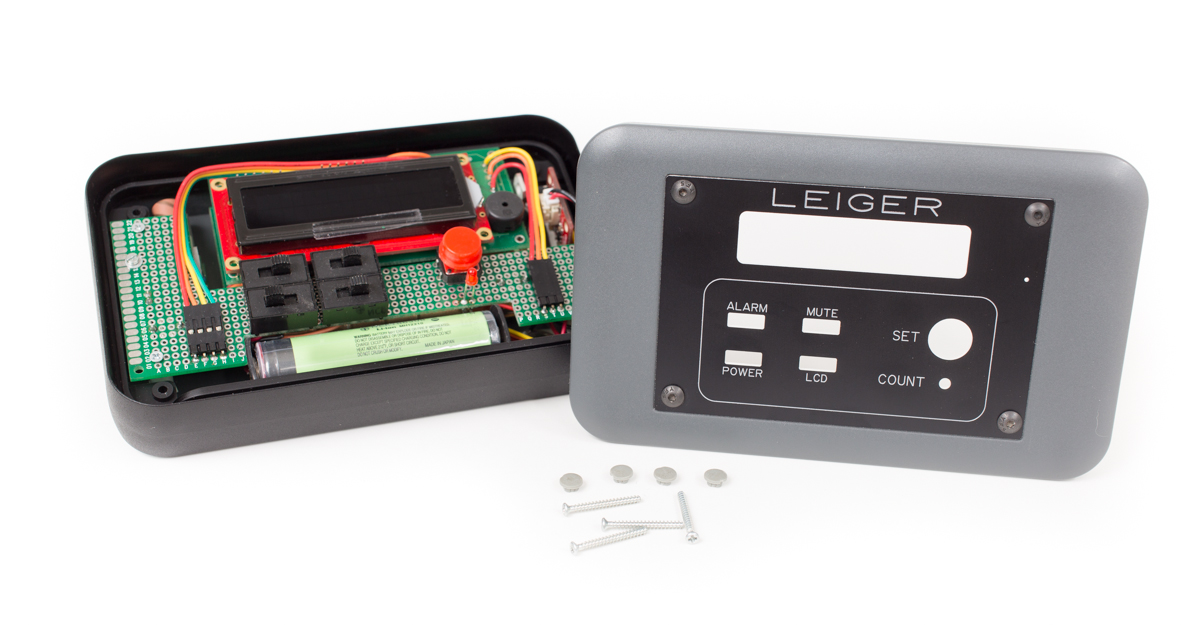
The main portion of the Leiger is based on the fantastic DIYGeigerCounter project. I bought it as a kit and made a few tweaks and adjustments. I wanted a simple interface for turning on and off the LED, buzzer, and screen. So, I moved a lot of the LEDs and buttons to a separate PCB. The PCB started as a standard protoboard, but I cut and hand-filed it down to the size I needed. I added some switches, a button, LED, and various connectors and mounting holes. I also needed a way to mount the GPS (a D2523T), as well as the geiger tube (SBM-20) itself. The case was from OKW Enclosures and faceplate was designed in SolidWorks and machined by Front Panel Express. As you can see, not much space is wasted here. I wanted it to be as small as possible.
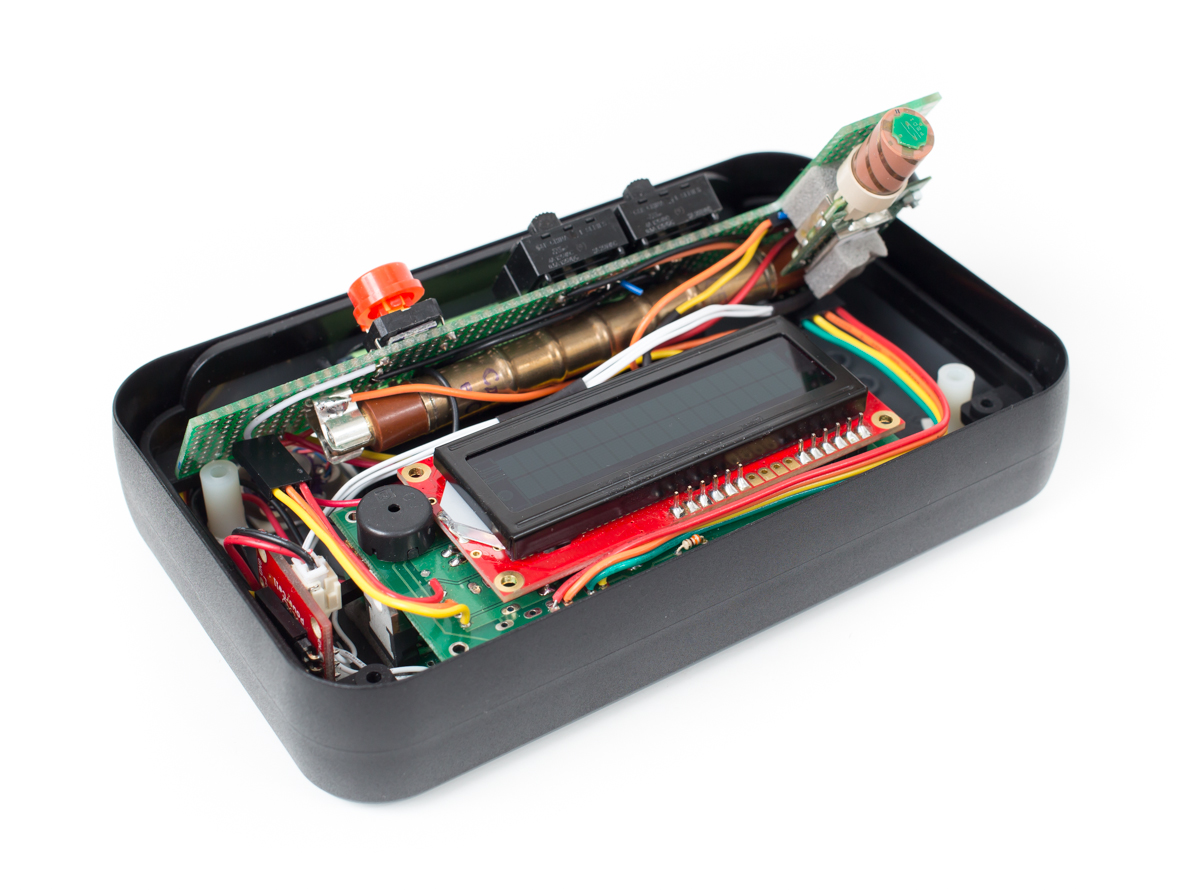
The control PCB as well as the LCD ‘shield’ sit on top of everything else, and cover the rest of the electronics. Once they are removed, you can see the actual Geiger counter board, the ATmega328, an OpenLog, and a PowerCell. The PowerCell worked wonders for this project and provides 5V to everything (except for the GPS, which has its own 3.3v voltage regulator), and charges the 18650 battery. Programming and testing was a bit tricky as the OpenLog sat on the FTDI header and needed to be removed for programming. Since most of the unit needed to be disassembled to get down there, I estimate I’ve completely disassembled the Leiger a few dozen times. If you look closely, you can see a lot of grey foam tape, which worked well for keeping everything in place, as well as added a bit of shock-proofing for travel.
Here is the code for the Leiger. I’m not a great programmer, so excuse the mess. It mostly works though. Ultimately, it just used an interrupt to count particles, and then displayed it on the screen in various fashions. It also stored these values at regular intervals (along with the GPS data) on an microSD, courtesy of the OpenLog. For keeping track of dosage (overall radiation exposure), I wrote this value to the EEPROM. I chose to write it to the EEPROM instead of the microSD because the RX (receive) was already being used by the GPS, so there was no elegant way to read in the dosage information when the unit was turned on. I didn’t want to rely on the softserial library (which is awesome) because I didn’t want to mess with the interrupts, which proved to be a good decision). In the end, all the information I wanted got logged. So, how radioactive was Chernobyl?
There’s not a really easy answer for this. Generally speaking, it’s not very radioactive. The vast majority of the zone has been decontaminated and is roughly the same level of radiation as the rest of the world. However, in a few instances, Chernobyl lives up to the hype. Normal background radiation (as measured by the Leiger), is around 20-30 CPM (counts per minute, or about 0.14 uSv/hour). In the picture above, you can see a reading of over 622 uSv/hour, or about 4500 times background. Also, if you’re doing the math, 10922 CPM doesn’t actually convert out to 622 uSv/hour. At first I thought it was an error. Actually, I didn’t anticipate measuring over 100k CPM, so the screen just isn’t formatted to display numbers that high. But as you can see in the data (posted below), it did peak at over 100k CPM (keep in mind that’s nearly 1500 counts every second).
What you’re seeing in the picture is a boot worn by one of the firefighters that responded immediately after the explosion. After 25+ years, it’s still extremely radioactive (I didn’t stay long). It was sitting in a hallway in the basement of the hospital. It amazes me that after all this time, artifacts like this still exist. We even saw a claw that was used to remove radioactive material from the roof of reactor 4. Overall though, with the exception of a few radioactive places and objects, the radiation is well controlled. So how much radiation did I end up getting?
After looking over the data, I came up with a good number. I took the total dosage (as recorded from the Leiger) over the course of the full 4 days I was in the exclusion zone. For all hours not accounted for with the Leiger (sleeping, when it was charging, etc), I took the background averages and filled in the missing gaps in the logs. Based on my readings for background levels here at home, and the total dosage I got from Chernobyl, I concluded that my 4 days in the exclusion zone was equal to just under 3 years of normal background radiation. It’s a lot in a short period of time, but it’s still well below the yearly limit for radiation workers, and just a fraction of the levels known to cause health problems.
Originally, I had planned to do a map of the radiation for the zone, but after getting the data back, I saw that the huge variances made graphing or mapping anything problematic. Because the hot spots were generally several thousand times higher than the surrounding area (and often-times inside a building), setting a scale was nearly impossible. I do encourage you to download the data and sort by the uSv rate. You will find some interesting places. See if you can find the cooling towers, Jupiter factory, hospital, cemetery (the only place in Pryp'yat that wasn’t decontaminated) and of course outside reactor 4.
For those of you that skipped down to the bottom, or missed the links in the text, here is the data, the Leiger code, and my pictures from the trip. Thanks for reading (or at least scrolling this far down). It was an amazing trip, and I’m very glad I went. For a photographer, just having access to these amazing locations was an experience of a lifetime. This was all a lot to cover and I’m sure I’ve left out some important details, so feel free to ask questions in the comments. Thanks again for reading.